Happy Wrapping!
Showing posts with label crafts. Show all posts
Hanukkah Gift Wrap
Monday, December 19, 2011
I thought I'd share an alternate and pretty solution for Hanukkah gift wrap. Boy do I love those chocolate coins (especially the dark chocolate ones). They also make a terrific embellishment. The kids will love having edible bows, trust me!
Lace Bowl and Votive
Thursday, December 1, 2011
I love this glowing votive bowl of lace made by Meg at Spirello.
Google didn't translate the page so well, but I believe she made it with lace doilies (not the paper kind), some fabric stiffener, and a balloon. Simply saturate the doilies with the stiffener, lay them on a balloon, allow to completely dry, pop the balloon, and you now have a beautiful bowl and votive for the holidays!
Holiday Favorites
Monday, November 28, 2011
Hi Creatives! Did I mention I was moving? Yep. Sadly, this means I won't be able to make a bunch of crafty things until January! I know, I'm sad too. There are still tons of fabulous creators and makers out there to report and give credit to. No worries, I will still be here. I still haven't told my sewing machine, though. Shhhh...
As you can see, over the weekend I found all sorts of inspirational holiday ideas to share with you!
1. Adorable Felt House Decorations by Poopscape
2. Wrapper and Fabric Scrap Wreath by Homelife
3. Ruffled Crepe Paper Streamers and Gift Wrap by Lorajean's Magazine
4. Owl Ornaments by con M de Mujer
Here are some of my other favorites:
Photograph taken by Tobias D. Albert
DIY Recyled Paper Wreath by Green Goody
Yarn Gift-Wrapping Ideas from Martha Stewart Weddings
Sewn Notebook Gift Tags by Pilosale
DIY Paper Candy Pouches by Peppermint Plum
Thanksgiving Whisk Mobile
Thursday, November 17, 2011
I can't believe Thanksgiving is almost here. Well, I can, due to the subliminal messages I've been trying to ignore: namely "sweet potato pie now!" and "pumpkin pie time!". I can't get that spice mix orange out of my head. Anyhow, I thought Thanksgiving was a good time to try out my whisk mobile idea, and now I can use it as our centerpiece!
I started out with a $2.00 whisk I bought at Ikea. They had one with a wooden handle and a loop for hanging at the end, which is perfect. You will need needle nose pliers for this and/or wire cutters. Snip the very center of each "loop".
Bend the branches back and arrange how you like. I put 8 straight out (leaving that nice curve) and then left 4 facing down. I thought of a chandelier and bent the branches accordingly.
Then make loops at the end of each branch.
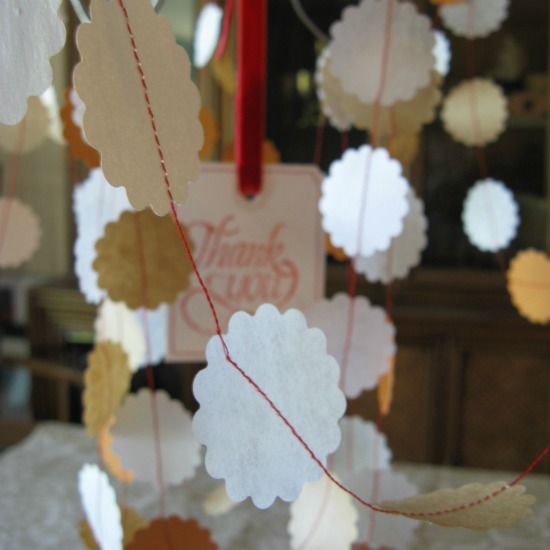
Now for the decorations! Since there's a cooking theme (there is??), I used parchment paper
and brown paper. Then I mixed in the nice spice orange stationary I had. You'll also need a Fiskar's punch: now punch those babies out! The look like little pies...yum!
String them together using red thread allowing a 3/4 in. space in between...
Then drape your long string on all branches (in the loops you made earlier, remember?)
Time for your center pendant. I know you got excited when you saw that red velvet ribbon!
Use an orange marker or ink pad to print "Thank You" on a white oak tag. Then stitch the edges.
Measure how long you want your "thank you" to dangle inside your mobile, then double it. Insert the ribbon through the hole and hot glue the end to the back of the ribbon. Then tie the ribbon around the handle at let it dangle in the middle.
Now string it up with some of your favorite jute or ribbon and hang where desired!
I don't take credit for the hutch in the distance. We've been living in someone else's home!
Mobile Madness
Tuesday, November 15, 2011
I can't believe how many wonderful mobiles there are! They're not just for babies anymore. I love this new trend of using them as centerpieces for a dining table, especially for celebrations. It's nice for those of us who don't have a chandelier or an outlet nearby. You can place them anywhere you like! Here are my favorites from Pinterest:
1. Modern Mobile: himmeli no. 1 by AMradio on Etsy
2. DIY Yarn ball Mobile featured on spearmintbaby.com
3. Modern Mobile on marthastewart.com
4. Mobile from Lonny, featured on livelovesmall.com
Here's a simple DIY mobile project using colored vellum by projectwedding.com:
And another great idea using embroidery hoops, found at Real Simple:
And one hip mobile for baby made of leather by thelittletiny:
It's got my head gently bobbing and spinning over how simple and beautiful mobiles are.
Time to make my own!
Tags for DSA
Wednesday, November 9, 2011
I'm so excited to start on DSA tags for my Etsy shop. Today I stitched up this cozy tag. I just might modify this for a set of gift tags for the holidays. I see some scrap calicoes in my future...
Don't Sew Angry on Etsy
Friday, October 28, 2011
I'm so excited to finally open shop at Etsy! I've been slowly adding items, including a few Rorscach tote bags, for those who don't want to try it themselves. I hope to be partnering with my husband to make some fabulous fabrics from his kaleidoscopic images, and soon I'll be whipping up another batch of my block-printed tree cards. Have a fabulous weekend, Creatives!
Chunky Knit Tee Scarf
Thursday, October 27, 2011
You can buy a recycled tee scarf at my Etsy shop.
This project started because I've been wanting to satisfy my chunky knit fix. There's all sorts of projects out there on repurposing t-shirts into fabulous scarves, so I thought I'd give it a try. A free t-shirt is like yesterday's business card, so they are not hard to come by. Besides, is it really necessary to keep an ill-fitting article of clothing that commemorates the junior banquet of your high school Latin Club? yes, I was a geek. Probably not. Seeing as I love to make things for free, I set out to deconstruct and reconstruct a few t-shirts by knitting them into an item I can actually use now. Here's how to do it:
Start with a few t-shirts you really shouldn't own anymore:
I used two large t-shirts. Cut them into 1 1/2 in. strips. I chose to cut only the shirt below the arm-holes, and not to use pieces with the applique on them.
do you see me?
Then sew all those strips together. It doesn't matter which sides you sew together, just that you end up with one long strip of cut t-shirt. This is your "yarn".
Now cast on 6 stitches. I used cable cast on. I love using my large wooden needles.
Then knit one side, purl the other as you would an ordinary scarf until you have no more "yarn". If you do not know how to knit, there are plenty of sites and videos on the web to learn. Here's a video I found that covers the basics.
You'll want to block the scarf, too. Lay it flat on an ironing board and iron it flat. Let it sit until it cools down.
To close this scarf, I chose a pin I'd recently gotten at a fun clothing store named GaGa in Iceland.
so cute!!
Next I might try a tie-dyed number, or shirts with patterns, which will give the scarf a nice depth.
Rorschach Tote
Tuesday, September 20, 2011
Now you can buy it! New Rorschach totes made by me here.
Hello Creatives! My idea for these totes was inspired by Project Runway Season 9. I have been watching it religiously since the very first season, and the challenge for episode 7 seriously got me thinking about: Ink Blots! This team challenge involved designing fabric, constructing five looks and creating the video for the backdrop. It was pretty obvious which team won, since the other "team" wasted their time attacking each other with senseless drama early on and then ran to their respective corners to nurse their wounds rather than collaborate. But I digress. The theme of the winning team was "chaos" and they chose ink blots as their inspiration. I was blown away by Viktor's gown:
and this dress by Anya:
images from www.mylifetime.com
It got me thinking about the beauty of making ink blots. You can't predict how they will turn out, and different people see different things. It's a nice conversation starter. I started off with some research. The original 10 ink blots in the Rorschach Test with their interpretations can be found here.
Then I set off to my local craft store for supplies. For this project you will need a blank tote, an iron, textile paint, a paint brush, some paper towels, a glass of water, and a piece of cardboard the size of your tote. You might also want something to cover your work surface, unless you love the idea of splattering paint on your family heirlooms.
Start by ironing the wrinkles out of your tote. Then pour (lightly) the textile paint in random shapes across one half of the tote. Forgive the blurriness: I was trying to pour and take a picture at the same time!
Fold the blank half of the tote over the painted half. Don't press too hard or for too long because the ink will bleed through the back.
Very carefully, unfold the tote. Immediately insert cardboard into the tote to prevent bleeding through.
Now you can use a paint brush to carefully collect the paint, or use paper towels. It is important that you don't have thick pools of paint, because these will dry very thick and you will see them when the paint dries. Wash your paint brushes in water.
Allow your tote to dry for 24 hours, then make sure you follow the directions on your textile paint to set the paint. This will ensure it stays put if you ever need to wash your tote.
Here are the three organic designs I made. I think they are all so different and fascinating.
Apparently I have a knack for making cute shapes even when I'm not trying to. This creature came about purely by coincidence. Now what does this say about my personality and emotional functioning? Hmm...
Subscribe to:
Posts (Atom)